The Story…

…is common amongst developers as they work on a new project or even maintain an old stable system. One must access resources that make up said system from time to time and some of us are guilty of opening security holes on occasion to make those changes easy to accomplish. Sure, companies give you great tools like IP restricted access and user access control, but from time to time, a quick database edit or a file change, or maybe even an easy way to restart a service, requires you to have access to something you don’t normally have open but do just for a little while…. Because it makes things easy.
…and by “Easy” I mean “Lazy”…
Here is my scenario, and a scenario that quite a few people had happened over the years…
I became a victim…
of ransomware some years ago when Mongo DB was first gaining some traction. I had a new client, that required a small database of medical provider information as part of their new web app for handling tele-medicine appointments. No worries, No HIPPA information was in it as it was still in prototype and development. Anyway, I did what a lot of developers do in the first stages of development.
1. Create a new Server
2. Download Mongo DB
3. Install Mongo DB with all the default settings
4. Give myself access to server by creating a user and opening the port
5. Locally install the developer tools to work on the database.
This is something I had done thousands of times on more mature products like MS Sql Server, Oracle or MySql where access to the database had intricate settings that would be set as the database is created. Little did I know that the default install left quite a bit open that the “hackers” of the world were already aware of this.
Weeks go by, all is fine, I am working in the DB, showing the User interface to the client and I am not thinking anything of the fact that I left this server wide open to script kiddie hacks…. Because really, who even knows this url exists? Literally, no one except for myself and the client.
9:00 AM
I start up my developer environment to start working for the day…. And by “9:00 AM” I mean “10:34 AM”, at which time I was welcomed with a flurry of fearful emails from the client.
“The site has this message all over it that states if we don’t pay $10,000 in bitcoin we can not have our data back”
Of course, I get a good chuckle about it (shhh, don’t tell my old client please), because I realized my mistake and it took me all of 3 minutes to restore the data from backup. This was the first glaring problem in my own laziness as a developer that I had to overcome.
From that day forward and for years and years and years… I never open a port to a back-end system again. Thus, what I always end up doing is either remote desktop to a server that has access to resources on a network, or I use a VPN…. Both are time consuming and very annoying.
Then… ZITI… To the rescue!
I am going to skip the initial, controller and router setup, from here on out it is assumed that you have the basic Ziti network setup and have ZAC in place to add access to systems.
Now my new list of tasks when I need to bring up a new system, I do the following:
1. Create a new Server
2. Install Required Resources like MySql, MS Sql, Oracle, Mongo, etc.
3. Install the appropriate Ziti Edge Client
4. Create A Service and Bind it to that server
5. Download the Identity to my local tunneler
6. Access the service with the local tools of my choice!
And the best part, I can use it on my machine, from any network, anywhere.
I didn’t mention before but security setups like Azure Sql Server where you have to add your IP for access. Well, that is all fine and dandy unless you are like me and like to travel from place to place, coffee shop, office, home, airport, Eiffel tower, hostel, Ritz, whatever…. And I can always quickly and easily access my systems in a time of need.
Lets first look at the configurations I put in place to access my companies main prototype development server to access an MS Sql Server without opening the ports to use Management Studio.
Once logged into your controller, go to “Ziti Config”.
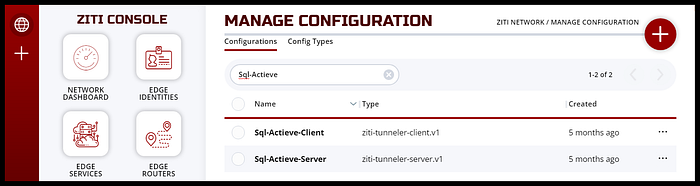
I create a config for the client and one for the server, lets look at each of them.
The Client Config
The client one is easy, select “Ziti-Tunneler-Client.v1”, give it an aesthetic name for managing it and assign a local hostname you would like to use and the port. I keep the port 1433 that way the client tools I use to connect can just use the default.
(This setup would be the same for like MySql, simply change the port to 3306, and so on.)

Now lets look at the “Server” Config. In this case select “Ziti-Tunneler-Server.v1”, give this an aesthetic name you will remember and set the protocol, hostname and port of the service as if you are on the server you are currently connected to. You see I use “localhost” because in fact, where the identity that will expose this resource, will be from the localhost of the remote server.
(That was a little confusing when I first set it up, but when you are making a “bind” service you are defining it as if you are working right on the remote machine)

Now comes the time to link those two configurations together and make a “Service”. Browse to “services” in ZAC.
(Of course all of this can be done via the command line, but personally I prefer interfaces)

Here I have defined a “Service” for those configs.
You could also have setup all those configs right in here like this on one screen, but I thought I would take you through the long hand steps first.
Now you would provide a name for the service, simply so you can find it in the future and select the two configs that you had previously created.
The Client Config

and the server

I select “Smart Routing” as a strategy and click “Save”. Here I could have set a “Role” that would automagically grant anyone with that role access to the service but for the sake of this article lets do things the hard way.
From here browse to “Identities” and create two identities, one for the client and one for the server. I will name mine Actieve-Sql-Server and Actieve-Sql-Client.

We will then create two policies, one for the server and one for the client.
The Server will be a bind policy

…and a dial policy for the client

And voila! Access to the resource on your client has now become available!
You can see the service definition in the client.

and then you can see it in action by accessing your server with management tools. You could also just setup a local connection to the server in your app using the appropriate connection string with what you have defined as your local hostname as well.

This may have seemed long and tedious but in reality it took all of a minute or two and from this point forward, whenever you need to access additional services you can simply add those services to the Dial Policy for your client identity. If the resources are on the same server simply add them to the bind policy that we created or better yet, just start using the “Role” field and add the same role to all of the identities and services and they will automagically grant you access from your work device…
anywhere.
Visit Ziti.Dev for more information!